As summer approaches and the weather heats up, thoughts of long weekend trips in the 911 will surely pop into your head. Some of these adventures may actually contain stints of driving in warmer than optimal temperatures. For these occasions we have the wonderful invention commonly known as air conditioning. However, nothing is guaranteed to offset your comfort level more quickly than the failure of your AC system. This will usually occur about 30 minutes into a drive, right after you say to yourself, “I think I’ll turn the air down just a tad.” The car, as we all know, can read your mind, and due to its twisted sense of humor has just overheated the A/C fuse block.
The reason this has occurred is simple. All of the electrical power needed to operate the A/C system goes through one fuse. This fuse (#20) is barely up to the task and, as a result, overheats quite easily. What usually happens is that the fuse ends corrode with age, and the contacts become weak. This causes extra heat from the increased resistance and melts the fuse holder clamping blocks.
Your A/C still works but you want to test the condition of your fuse block? First run the A/C for a normal trip and then feel the temperature of the fuse. (Be careful!) If it is uncomfortably hot to the touch you have a bad connection in the block. Next take a small screw driver and turn the clamping screws (6 of them) back and forth on the fuse block. Does the clamping block move when you turn the screw? If you answered yes to either of these questions then you need a new fuse block.

(optional fuse block.jpg)
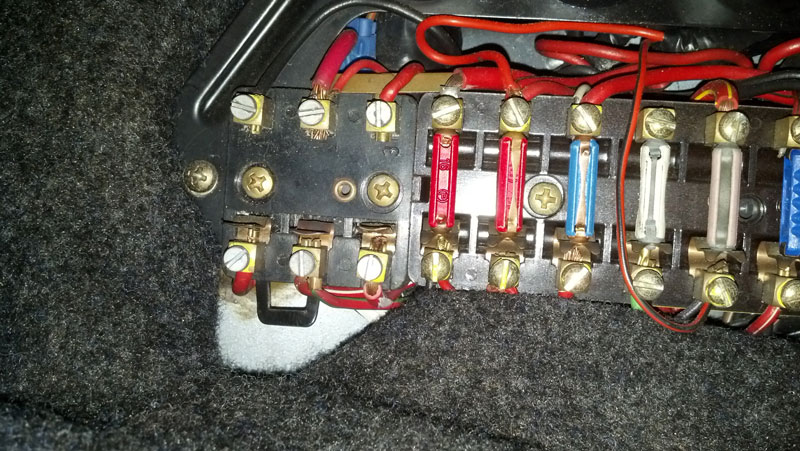
Fortunately the repair and prevention of this problem is not difficult. The fuse box consists of a line of 21 fuses. These fuses are divided into 3 separate blocks. The first block of eight fuses (counting from the front of the car) are for parking, head, and fog lights. The second block of fuses (a total of 10) are used for basic electrical functions: sunroof, wipers, fuel pump, etc. The last 3 fuses, the ones we are interested in, control the headlight washers, air conditioning, and power windows. This is called the optional fuse block for obvious reasons. This is where our repair will take place.

(front fuse block.jpg)
Instructions are as follows:
1 Disconnect battery ground cable. (Do you know your alarm and or stereo security code? Now is the time to check.)
2 Draw a diagram of the wires (numbers and their colors) that connect to the top and bottom of this fuse block. This may come in handy if you run into a wiring question later. Or do as I do and take a picture with your cell phone camera that is on your hip.
3 Remove these 3 fuses.
(fuse block wires.jpg)
4 Loosen all 6 wire clamping screws, and pull wires just out of their holders.
5 Remove two Phillips head mounting screws and remove the fuse block.

(91161309302 front)
6 With the old block out of the way, now is the time to repair any wiring that may have been overheated and might cause a poor connection. In most cases, you can just cut the offending 1/2 inch piece of wire off. Then just strip and solder-coat the end and you will still have sufficient length to reach the clamping screw.
If this is not the case, a piece of fresh like colored wire can be carefully grafted into place. This should be a quality solder repair with heat shrink tubing for insulation, no crimp connectors and electrical tape!
7 Now that you have fresh wiring in place, it is time to install the new fuse block. Look at the back of the old 3-pole fuse block.
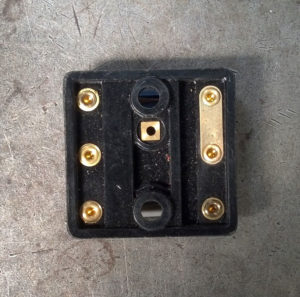
(91161309302 back)
The top clamping lugs will likely have a connection bridge to combine the power circuit. Some years are separate; some are bridged on two poles and some on three. The new part 911.612.093.03 replaces all earlier versions and is connected on all three circuits. If your old fuse block is different from the new one you must modify the new block to match. Just cut the required bridge portion to open the circuit. You can use a pair of diagonal cutters, but I prefer a Dremel tool or small die grinder to cut out the required section of the brass strip.
8 Install the wiring into the empty wire clamps and tighten the screws. This is where you might want to refer to your wiring diagram from step #2. Make the connections snug but be careful not to over tighten. Now install new fuse in the new fuse block. This is a good time to replace all 21 fuses in the fuse block. It is crucial to make sure you are replacing the fuses with the correct amperage. The best reference is your owner’s manual which will tell you the amperage of each circuit with a picture of the fuse block. The fuses are color coded and here is the fuse color code: Yellow: 5amp, White 8amp, Red 16amp and Blue 25amp.
9 Reconnect battery ground cable and test operation of all three electrical circuits. (Air Conditioning, power windows, and headlight washers)
Now, comfort level intact, all will be well for your next excursion into warm weather.
P.S. Remember to change fuses regularly. If the metal strip is wavy, the fuse needs replacement. And don’t forget; there is another 3-pole fuse block in the car that isn’t in the front trunk. It is in the engine compartment under the black plastic cover on the left side. It is the one with two wing bolts holding it on. You won’t need an owner’s manual to check for fuse capacity back there though. Turn over the black plastic cover and it will be printed on the inside surface.